This little craft project one isn’t mine, and two is kinda old even though it was just mostly finished on January 1. When we were getting Tyler’s nursery ready early last year, we knew we wanted to put a lot of ourselves in it. I made two little framed elephants out of cardstock and a framed T made from buttons. Eric wanted a handmade project as well but wanted to add our families and our history into the mix. He decided to make a rather large reverse family tree (Tyler being the trunk of the tree) to hang in Tyler’s room. Honestly at first I was a little put off by his idea (judgmental even…go figure!) . I thought it was a little creepy to hang pictures of dead people in our baby’s room. I did manage to talk him out to going back past our great-grandparents though. In all honesty though, it turned out really well and looks great!

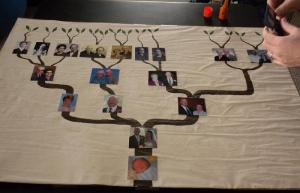
The full picture of Tyler’s family tree with the gap where my family is missing a few pictures
Eric first collected pictures of all our families. There were easy ones like those of Tyler, Eric and I, and our parents. Then it started getting a little tougher. Collecting pictures of our grandparents (mostly my grandparents) with no one else in them became a bit of a challenge. We had to turn to our parents. Eric’s family has done a lot of family history “stuff”, and he had photos of all of the Stoecker side of his family. His Grandma Faris was a great source for photos for mom’s side of the family. So all his photos came together pretty easily. Mine on the other hand didn’t. My parents did a great job of collecting photos for us, but there just wasn’t the single go to person like there was for his sides. Because of this Eric was able to complete his side during the 2 weeks he took off after Tyler was born. It’s been hanging in Tyler’s room like that since then. We’d had my families’ photos for quite awhile now, and I was finally able to convince Eric that he needed to get back to it. The tree was looking a little lopsided, and I didn’t want my parents to feel like they’d collected all those photos for nothing.
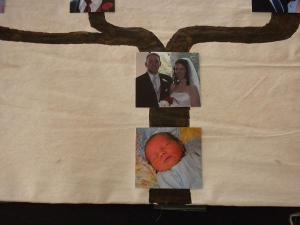
The trunk with Tyler and our wedding photo
The supplies were fairly minimal. We bought a poster frame and some large drawing paper. That was it. We also needed the photos (which Eric sized and printed out on our printer), brown paint, green paint, paint brushes, a photo glue stick and some coffee all of which we already owned. Since this mostly all took place the first few weeks of Tyler’s life, I don’t have any step by step photos but here’s a run down of the process.
- Cut your drawing paper to size to fit in your frame.
- To make the paper look older, Eric used watered down coffee to stain the paper. It looks great and it hasn’t molded or smelled yet!
- Once the paper was dried, Eric traced out tree branches that would work with the pictures we had, so there is only one branch if the couple had a picture together or multiple if we couldn’t find a picture of them together.
- Once those were drawn in to his satisfaction with pencil he painted in the brown for the limbs.
- Eric made a template for the leaves at the top and drew those in and painted them green.
- When all the paint was dried, Eric glued on the pictures and put it into the frame.
Eric gluing on a picture.
That was it. A fairly simple project but pretty time consuming…for Eric anyway! It’s actually not completely done. We’re missing photos of my Grandpa Ensor’s parents. We’re not sure if we can find any of those so it may be done but there is room to add them if the photos ever turn up.
It’s a really nice addition to the nursery and hopefully something Tyler will enjoy a lot as he gets older (I’m guessing he’ll have to be at least 20 to really appreciate it!)
